How to Reduce Render Noise: 9 Fixes for Grainy Renders
Why do grain and bright fireflies appear in renders? From sample counts to denoisers, here are 9 practical fixes for a clean render.
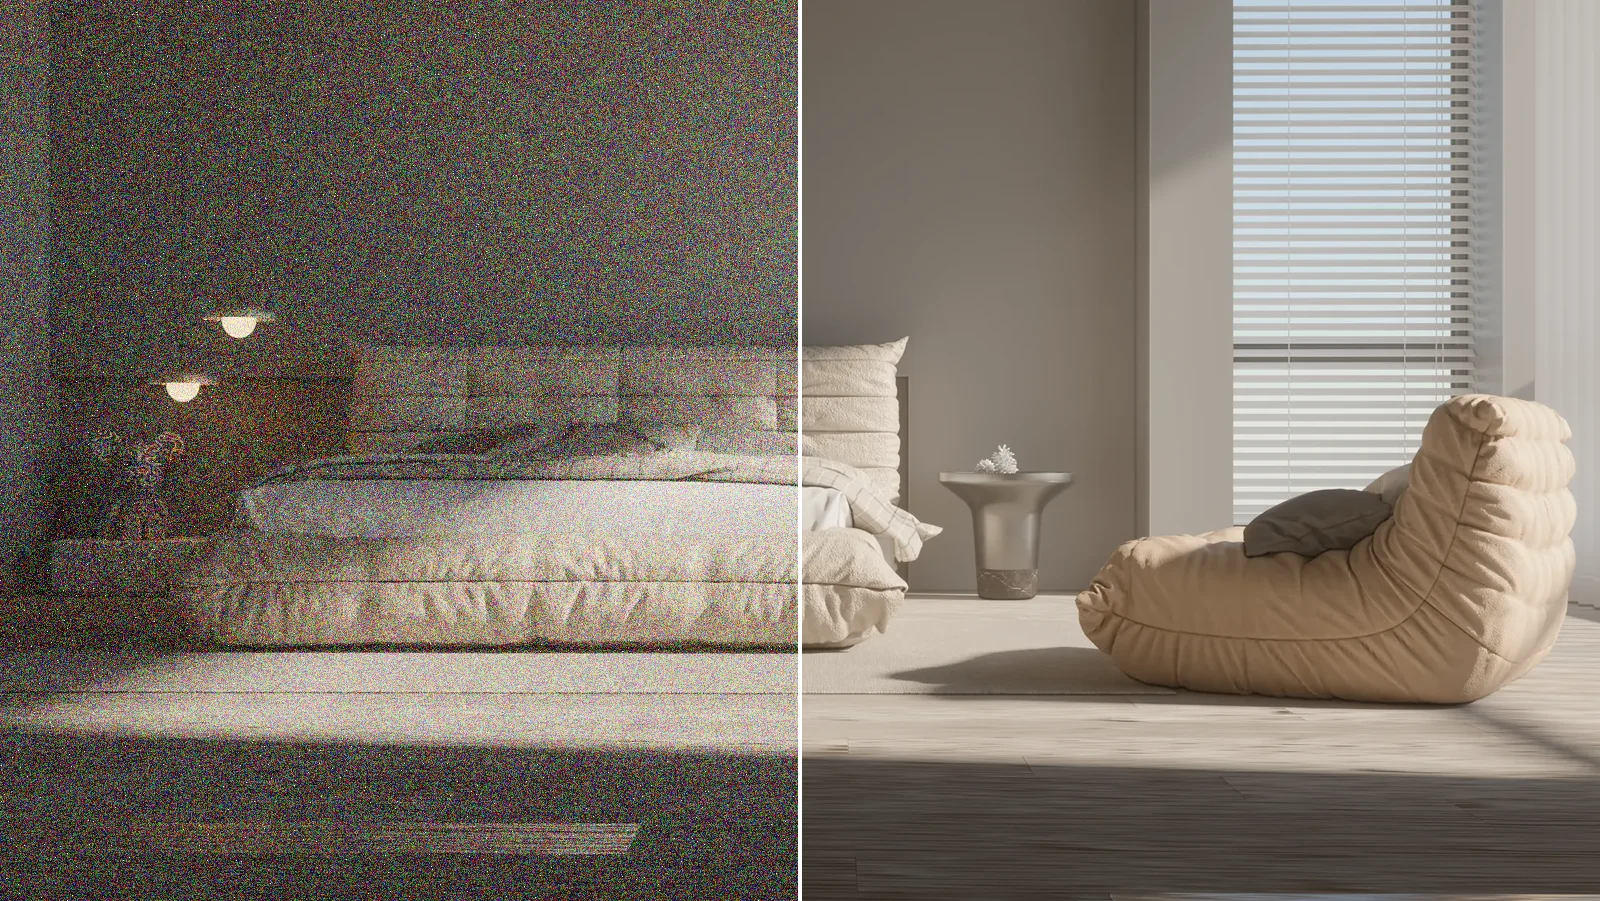
The cover image is illustrative: the typical grain of a low-sample render was added to the left half for explanation; the right half shows the same scene clean.
Grainy renders are the most common complaint in architectural visualization: the image looks finished, yet speckles, colored dots and bright white spots remain on the walls, in the shadows and in dark corners. In render engines this grainy look is called “noise”. In this guide we explain why noise appears and how to reduce render noise with 9 fixes architects can apply to get a clean render.
Why does noise appear in renders?
Most photorealistic render engines calculate the path of light through a scene using random samples. When not enough samples are collected for each pixel, the average does not settle and neighboring pixels appear at different brightness levels. The result is noise. We explained how this method works in detail in our article what is path tracing.
Noise increases especially in these situations:
- Interiors where light enters only through a small opening
- Corners that receive no direct light and are lit only by indirect light
- Very small but very strong light sources
- Frosted glass, glossy metal and reflective surfaces
- A short render time or a low quality setting
How to reduce render noise: 9 fixes
1. Increase the sample count or render time
This is the most direct fix. Raise the sample count, quality level or time limit in your render engine. Noise decreases as the number of samples grows, but the relationship is not linear: halving the noise often takes about four times as many samples. That is why simply increasing the time is not always the most efficient approach.
2. Use a denoiser
AI-assisted denoisers intelligently clean up the grain in a low-sample image. Used correctly, they shorten render time considerably. A word of caution: heavy denoising on an image with very few samples can smooth out textures and create a “plastic” look. The best result comes from combining a reasonable sample count with a render denoiser.

3. Make it easier for light to enter the space
The biggest cause of noise is light struggling to reach the scene. Check for unnecessary objects blocking windows and openings (curtains, surfaces forgotten behind frames). In interiors, a light portal placed outside the window or settings that direct sky light inward make it easier for light to get in.
4. Avoid small, very strong lights
A very small but high-power lamp is the most common source of bright white spots, known as fireflies. Making the light source larger and lowering its power gives the same brightness with less noise. A similar approach applies to hidden LED strips.
5. Check your HDRI and sky settings
A very bright, small sun in an HDRI environment image can increase noise in interiors. Defining the sun as a separate light, or balancing the HDRI’s resolution and brightness, cleans up the result.

6. Simplify your materials
Very rough reflections, frosted glass and complex layered materials put a heavy load on the render engine. Using simple materials on objects too small to notice in the image reduces both render time and noise. For tips on matching materials and light, also see our article how to create realistic renders.
7. Clean up errors in the model
Overlapping faces, reversed faces and unused components can cause unexpected lighting errors and blotches in a render. Cleaning up your model before rendering (purging unused items, fixing overlapping faces) solves a large share of problems from the start.
8. Choose the resolution for the job
A very high resolution means many more samples for the same quality. Rendering larger than needed for the web and social media only makes the render take longer. If you do not need print, choose a resolution that suits where the image will be used.

9. Render “until clean”
Some render engines can render until a target clarity is reached instead of for a fixed time. With this method, the render stops on its own once the image is clean enough. In Render Fun, the free SketchUp plugin we developed ourselves, this feature appears under the heading “AI denoiser and “Until clean””.
Quick checklist to prevent noise
- Do the windows and openings let light in?
- Is there a very small, very strong light?
- Is the denoiser turned on?
- Is the sample count or render time right for the job?
- Are there overlapping or reversed faces in the model?
- Does the resolution suit where the image will be used?

Frequently asked questions
Is render noise caused by a weak graphics card?
Not directly. A powerful graphics card calculates the same number of samples in less time, so you reach a clean result faster. But the real causes of noise are too few samples and light struggling to reach the scene. For hardware advice, see our guide to the best computer for architectural rendering.
What causes fireflies in rendering?
They usually come from rare light paths originating from very small but very strong light sources or from glossy reflective surfaces. Making the light larger and using a denoiser usually solves the problem.
Why are exterior renders less noisy?
Because outdoors, sunlight and sky light reach surfaces directly. Indoors, most of the light is indirect and has to pass through windows, which requires more samples.
Would you rather have your project professionally visualized than fight with noise? Browse our architectural rendering projects or send us your drawings on WhatsApp.